Geez… Almost the same as the last post.
Last brewing day, new lens, random pics.
Here you go: 
Geez… Almost the same as the last post.
Last brewing day, new lens, random pics.
Here you go:
Haven’t done much brewing at home these last few months but the last time I did I made a bit of an effort to take a few pictures with a recently acquired lens. Nothing special here but some random “artsy” shots from the day.
Enjoy!
")
")
")
Got invited a little while ago to brew with the Four Fathers. They’re an Elora-based start up brewery or concept brewery that is just starting to get off the ground with a few good beers and recipes.
I met the Four Fathers when they came to Grand River Brewing for a brew day. We hung out for the day on “my” brew system and had a great time. At the end of the day they invited me to their brewery for a brew day. “It’ll be fun”, they said. “We’ll have a great time”, they said.
They weren’t wrong. Here is what greeted me upon my arrival at “the brewery”:


(Please see title of this blog post LOL)
Behind the scenes, however, it was closer to my usual brewing experience:

Controlled chaos, moments of confusion, missed timings, near boil overs, slight messiness… Really, just the usual brewing experience.
They have a Sabco BrewMagic brewing system which was a treat to brew on. New to me but if I were to do it again I would do a bit more reading on it and figure out a few more of the features of the system to allow for repeatablility of recipes and programming mash profiles etc. Would love to have one of these for my own use but will need to save up a few more dollars before that happens. 😉
We ended up brewing a session IPA, of sorts. We’ll find out in a couple of weeks. Hopefully I’ll be able to get back to have a taste and maybe brew another beer. One more father in the mix of Four Fathers.
It’s all come together! It is, for all intents and purposes, done. There certainly is some tweaking to do and a few bits and pieces on my wish list but it works and makes a bunch of beer in one go.
My last brew day I took some pics to show the set up. Some of the line set up is not pretty but that is part of the tweaking. I’ll just have to have a few more brew days to figure it all out. 😉
This is generally what my driveway/brewery looks like on a brew day. The blue cooler is no longer a MLT but is now a bin to tote material from inside: scale, chiller, pumps, etc.

The Brewery
HLT set up for heating strike water. I recirculate the water as it’s heating just to avoid hot/cold layers. It makes the temp reading up top a bit more accurate. This is one place I could use an inline thermometer.

HLT
My fly sparge set up. HLT to pump to MLT. MLT to pump to BK. Flow adjusted so hot water into MLT is roughly the same rate as wort to BK. Works like a charm!

Fly sparge
Top of MLT. Foil with holes just to avoid channeling in the grain bed.

Sparging
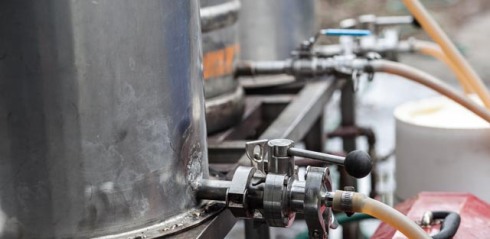
Lauter line into BK. I had originally had the line with the tri clamp fitting as the lauter line and had that attached to the top port. This set up is better with the line going to the bottom of the BK. Less splashing, less foaming, easier to see volume when the wort gets near the top.

Lautering
This is the set up for sanitizing the chiller. For the last 15 minutes of the boil I just recirculate wort through the lines and chiller. The line set up is not pretty and I’ll be tweaking that so that the moving of lines for cooling in and chasing wort with water is a bit easier and smoother. Using the MLT as a chiller stand was a last minute thought and works well. I had originally thought about mounting the chiller on the stand but knowing now how much back flushing is required it’s easier to have it loose for now.

Sanitizing Chiller
Set up for cooling in. This basically works. The line from BK to pump needs to be on the other side of the keg the chiller is sitting on. Part of my waste water from the chiller is going back into the HLT so that when wort is done in the BK I chase the wort through the lines with the water from the HLT. This is another place I would use an inline thermometer just to adjust the flow and get the pitching temps right, or at least close.

Cooling In
There you have it! That’s basically a brew day on my new set up. Thanks to Clay for the build and thanks to Scott for the gas plumbing and pump box! Fantastic work!
Scott was at my house last night to start in on the gas plumbing for the brew stand. He has mad skillz in that regard. I held things. And took pictures.

valve and tools

Burners and pipe wrenches

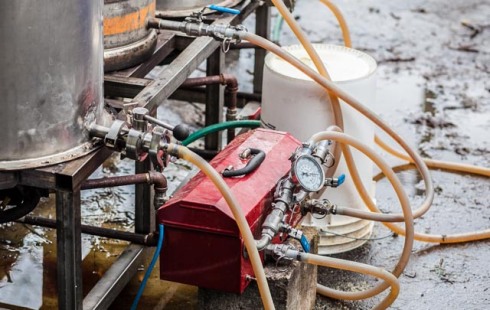
Dope with pumps in the background

Love the red handled valves. Such red.
With the brew stand nearing completion one of the things I wanted to do was run my large volume equipment through a brew day. This is not my complete setup, I used only one of the large vessels instead of both and I don’t have my pumps hooked up yet.
My process is pretty common with this setup:
This gives me two vessels to work with and the need for only one burner. I actually use two burners in case of the need to heat the MLT. The second time I brewed on this set up I didn’t need to heat the MLT but the first time I did.
Here are a few pics of the process…
Mashed into a 50L keggle which according to my calculations would be able to hold 40lbs of grain. It did but it was completely MAXED out. No more room for anything! That was, in fact, my intent with this particular brew: max out every vessel to find out what my volume limits were. I found out. 😉

MLT maxed out
Tried a new technique for me this time: fly sparging. It’s just setting the flow of sparge water to match the flow of lautering. Not difficult it’s just that I had never been set up for that before. Discovered it’s the best thing ever! It’s just too easy and there’s really no babysitting of the MLT or much scooping of water involved.

My fly sparge setup.
I did heat my MLT half way through the rest to bring the temp back up. With the MLT maxed out there was really no room for much stirring so I really didn’t have an accurate sense of the temperature. After emptying the MLT I did see that there was a bit of scorching evident but I’m sure I’ll still end up with beer.

Scorch!
Lautering and boiling were just fine and got to about 80L or so pre-boil. Another new addition to my set up is the plate chiller seen in this photo on the work bench. (The pump and burner are courtesy of Scott.) Sanitizing the plate chiller prior to chilling was dead easy. I just hooked everything up in the last ten minutes of the boil and ran the boiling wort through the system. This dropped the temp a bit and halted the boil for a minute or so but I just kept running the system and the boil came back. Super easy!

Sanitizing the chiller
The chilling and cooling in itself was super easy. Once the boil was done I whirlpooled and rested (manually, just by stirring the BK). My chiller was already set up from the sanitizing stage so all I had to do was get my carboys in place and fire it up. With this set up and the water turned on about a half turn on the faucet I was able to cool and transfer the full volume of about 80L in just 10 minutes! You can also see it’s reasonably aerated, not something I’ve worried about a whole lot but it’s certainly not a gentle transfer.
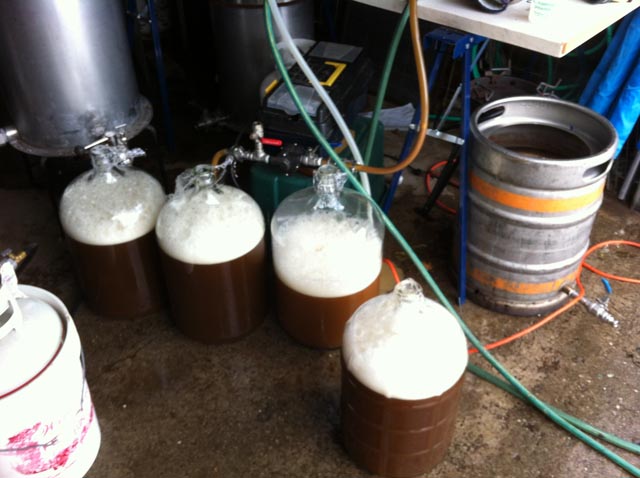
Cooling in
There are a few things that will be changing with this setup and moving to the brew stand: My pumps will be wired in, burners will be in place, less moving of vessels, more space for me to move around. All of this… Soon.
Another fun project on the go. This time in collaboration with a few people from my homebrew club: GRAB. We’re getting a barrel!
My good friend, Peter, alerted me to an offer that the Montrealers (Montreal’s homebrew club) were getting. It turns out the family of one of their members lives near a winery and the winery was getting rid of some used surplus barrels. For cheap!
Peter contacted me and with very little thought I went ahead and reserved one through him. He was kind enough to do all the logistics and is currently storing the barrel at his place until I’m able to get there for pick up.
Now it’s just a matter of deciding what to do with it. We’ll definitely do some sort of big brew into it with the members of GRAB and that is in discussion on our forum but one of the more important decisions is exactly WHAT to brew into it. Your input is welcome on this. We do know it was a red wine, Frontenac varietal, American oak barrel. Let’s go with that.
Here are a variety of pictures of what I bought with thanks to Peter Christensen and Sebastian Verreault for the photos:


I just returned from a 2 1/2 week tour of China with a brass ensemble I’ve played with in the past: Brassroots.
It was an amazing time seeing an entirely different part of the world than Canada. The sights, sounds, smells, people, architecture, all so different and new to me.
Of course the main point of the blog is brewing and beer so I would be remiss if I didn’t focus on that small portion of the tour here. In short, all the beer I had in China was macro international lager style. Extremely meh. I tried several different brands but they were virtually indistinguishable from each other.
That said, when it’s 39∘C outside with a humidex hovering around 50∘C I tend not to get too picky about my beverages (except the tap water in China 😉 ). A cold beer or two served with lunch or dinner was definitely a welcome break.
A couple of things about the beer in China: First off, it’s very low alcohol beer. The strongest beer that I had was about 4.3% abv and the lightest beer was 2.3% abv. Definitely not beer that will knock you on your ass.
The other thing about the beer (and many other beverages) is that it’s sometimes difficult to get it served cold. The Chinese apparently are not terribly fond of cold beverages. We found this with the bottled water (room temp.), warm milk, warm juice, hot juice, and often room temperature beer. Many places had beer kept in a fridge but they didn’t usually keep many there so with a group of about 20 adults we regularly cleaned them out of their cold beer.
Some fond beer memories:
And a gallery of beer photos for you!
 (3 of 7)")
 (7 of 7)")
 (5 of 15)")
 (14 of 52)")
 (46 of 52)")
 (56 of 56)")
 (16 of 25)")
 (23 of 2)")
A little while ago a friend contacted me about a brewery tour trip. Sounded like a great idea to me: 40 or so people, bus, brewery tours, dinner, home. A decent way to spend a Saturday afternoon. He had contacted me each year about this but I have not been able to attend until this year.
One of the changes to the tour this year was that they decided to visit a distillery, Still Waters Distillery in Vaughan to be exact. Great idea!
I had never been to a distillery. I knew about spirits and the basic (very basic) process involved in creating whisky, bourbon, vodka, etc., but had never seen it action or heard more details about it.
Barry Bernstein and Barry Stein were very gracious hosts showing us around their compact distillery and explaining the processes and answering our questions. I peppered Barry Bernstein with several questions about the process of mashing and fermentation as only a brewer would. I found this aspect fascinating as I had been aware of the connection between brewing and distilling but had never had properly explained to me.
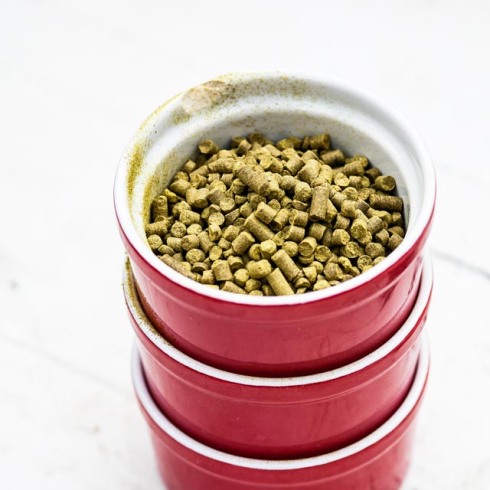
One aspect that was interesting to me and will be of interest to my readers (both of you) is how coarse they crush the grain when mashing in. Barry was kind enough to let me photograph a sample of the grain crush they use and you can compare that to the crush I use at home when brewing beer.

This is how fine their crush is for their mash.
Another one of the differences between distilling and brewing that I found interesting is the amount of sanitizing that is required. When we entered the distillery they were in the process of distilling some spirits that were entering a vessel at approximately 85% abv. No cover, no transfer lines, just liquid flowing from a spout into an open tank. Of course, at 85% abv there isn’t an organism that will survive a swim in that tank!
After an explanation of the process for distillation it was sample time! Barry Stein handled the sample table, explanation of the products, and any other questions from the group. Barry is an affable gentlemen with a fabulous voice (which I didn’t tell him at the time) and was generous with the samples. Not so much in quantity of each sample but we were basically told that whatever product we wanted to try just say so and we could try it.

Barry serving out samples to the group.
I’m no spirits expert but I tried the cask strength whisky and regular strength. Both were excellent but I certainly preferred the body and flavour of the cask strength.
Later that day we did visit other breweries but their tours paled in comparison to the Still Waters Distillery visit. I came out of that tour with a renewed appreciation and fascination of the process of distillation, something I had not expected at all. If you can’t get to the distillery itself they do have an excellent explanation on their website of the process. (Bottom of the page.)

